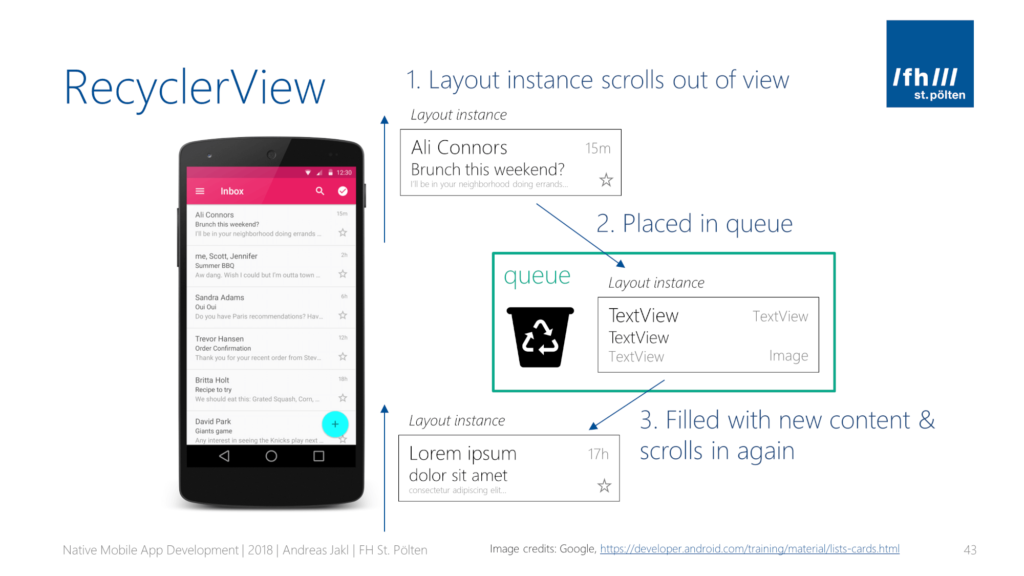
Class RecyclerView supports the display of the data set. This implement programming style that results in a good performance.
It also comes with a default animation for removing and adding elements. RecyclerView possible to use a different layout manager to position the item. Using ViewHolder to keep a reference to the display to one entry in the view RecyclerView.
The adapter manages data model and adapt it to the individual entries in the widget. This expands RecyclerView.Adapter class and assigned to the view recyclerview through RecyclerView.setAdapter method ().
Adapters preparing the layout of items by inflating the correct layout for individual data element. This work was done by the method onCreateViewHolder. It returns an object of type ViewHolder per entry recyclerview visual display.
Application examples Recycler view

<RelativeLayout xmlns:android="http://schemas.android.com/apk/res/android" android:layout_width="fill_parent" android:layout_height="?android:attr/listPreferredItemHeight" android:padding="6dip" >
 <ImageView android:id="@+id/icon" android:layout_width="wrap_content" android:layout_height="fill_parent" android:layout_alignParentBottom="true" android:layout_alignParentTop="true" android:layout_marginRight="6dip" android:contentDescription="TODO" android:src="@drawable/ic_launcher" />

 <TextView android:id="@+id/secondLine" android:layout_width="fill_parent" android:layout_height="26dip" android:layout_alignParentBottom="true" android:layout_alignParentRight="true" android:layout_toRightOf="@id/icon" android:ellipsize="marquee" android:singleLine="true" android:text="Description" android:textSize="12sp" />

<TextView android:id="@+id/firstLine" android:layout_width="fill_parent" android:layout_height="wrap_content" android:layout_above="@id/secondLine" android:layout_alignParentRight="true" android:layout_alignParentTop="true" android:layout_alignWithParentIfMissing="true" android:layout_toRightOf="@id/icon" android:gravity="center_vertical" android:text="Example application" android:textSize="16sp" />
 </RelativeLayout>
The following exercise shows how to use RecyclerView
level of reliance on the use recylerview Widget RecyclerView delivered as a library and can be used as an API 7 level or higher. Add a dependency to the latest version of this library file to build Gradle you to use it.
dependencies {
    ...
    compile "com.android.support:recyclerview-v7:25.1.1"
}
1. Create a project and add the Gradle dependency Add dependence required to file your Gradle build. See dependence recyclerview Gradle to use the display for details.
2. Make File Layout Create or update the layout file called activity_main.xml so that it contains.
<RelativeLayout xmlns:android="http://schemas.android.com/apk/res/android"
    xmlns:tools="http://schemas.android.com/tools"
    android:layout_width="match_parent"
    android:layout_height="match_parent"
    tools:context="${relativePackage}.${activityClass}" >

    <android.support.v7.widget.RecyclerView
        android:id="@+id/my_recycler_view"
        android:layout_width="match_parent"
        android:layout_height="match_parent"
        android:scrollbars="vertical" />

    <ImageView
        android:id="@+id/imageView1"
        android:layout_width="wrap_content"
        android:layout_height="wrap_content"
        android:layout_alignParentBottom="true"
        android:layout_alignParentRight="true"
        android:layout_marginBottom="12dp"
        android:layout_marginRight="12dp"
        android:elevation="2dp"
        android:src="@drawable/ic_add_circle" />

</RelativeLayout>
Creating a new layout to be used in each item (rowlayout.xml):
<RelativeLayout xmlns:android="http://schemas.android.com/apk/res/android"
    android:layout_width="fill_parent"
    android:layout_height="?android:attr/listPreferredItemHeight"
    android:padding="6dip" >
    <ImageView
        android:id="@+id/icon"
        android:layout_width="wrap_content"
        android:layout_height="fill_parent"
        android:layout_alignParentBottom="true"
        android:layout_alignParentTop="true"
        android:layout_marginRight="6dip"
        android:contentDescription="TODO"
        android:src="@drawable/ic_launcher" />

    <TextView
        android:id="@+id/secondLine"
        android:layout_width="fill_parent"
        android:layout_height="26dip"
        android:layout_alignParentBottom="true"
        android:layout_alignParentRight="true"
        android:layout_toRightOf="@id/icon"
        android:ellipsize="marquee"
        android:singleLine="true"
        android:text="Description"
        android:textSize="12sp" />

    <TextView
        android:id="@+id/firstLine"
        android:layout_width="fill_parent"
        android:layout_height="wrap_content"
        android:layout_above="@id/secondLine"
        android:layout_alignParentRight="true"
        android:layout_alignParentTop="true"
        android:layout_alignWithParentIfMissing="true"
        android:layout_toRightOf="@id/icon"
        android:gravity="center_vertical"
        android:text="Example application"
        android:textSize="16sp" />
</RelativeLayout>
Creating a Class Adapter (MyAdapter.java).
public class MyAdapter extends RecyclerView.Adapter<MyAdapter.ViewHolder> {
        private ArrayList<String> mDataset;
        public class ViewHolder extends RecyclerView.ViewHolder {
                public TextView txtHeader;
                public TextView txtFooter;
                public ViewHolder(View v) {
                        super(v);
                        txtHeader = (TextView) v.findViewById(R.id.firstLine);
                        txtFooter = (TextView) v.findViewById(R.id.secondLine);               }        }
        public void add(int position, String item) {
                mDataset.add(position, item);
                notifyItemInserted(position);        }
        public void remove(String item) {
                int position = mDataset.indexOf(item);
                mDataset.remove(position);
                notifyItemRemoved(position);        }
         public MyAdapter(ArrayList<String> myDataset) {
                mDataset = myDataset;        }
  @Override
        public MyAdapter.ViewHolder onCreateViewHolder(ViewGroup parent,int                                                     viewType) {
                View v =    LayoutInflater.from(parent.getContext()).inflate(R.layout.rowlayout,    parent, false);
                ViewHolder vh = new ViewHolder(v);
                return vh;        }
        @Override
        public void onBindViewHolder(ViewHolder holder, int position) {
                holder.txtHeader.setText(mDataset.get(position));
                holder.txtHeader.setOnClickListener(new OnClickListener() {
                        @Override
                        public void onClick(View v) {
                                remove(name);                        }            });
                holder.txtFooter.setText("Footer: " + mDataset.get(position))   }
@Override
        public int getItemCount() {
                return mDataset.size();
        }
}
Now configure recyclerview in your Activity (MainActivitiy.java).
public class MyActivity extends Activity {
    private RecyclerView mRecyclerView;
    private RecyclerView.Adapter mAdapter;
    private RecyclerView.LayoutManager mLayoutManager;

    @Override
    protected void onCreate(Bundle savedInstanceState) {
        super.onCreate(savedInstanceState);
        setContentView(R.layout.activity_main);
        mRecyclerView = (RecyclerView) findViewById(R.id.my_recycler_view);

        mRecyclerView.setHasFixedSize(true);
        mLayoutManager = new LinearLayoutManager(this);
        mRecyclerView.setLayoutManager(mLayoutManager);

        mAdapter = new MyAdapter(myDataset);
        mRecyclerView.setAdapter(mAdapter);
    }
    ...
}
Source: Master Android (App)


